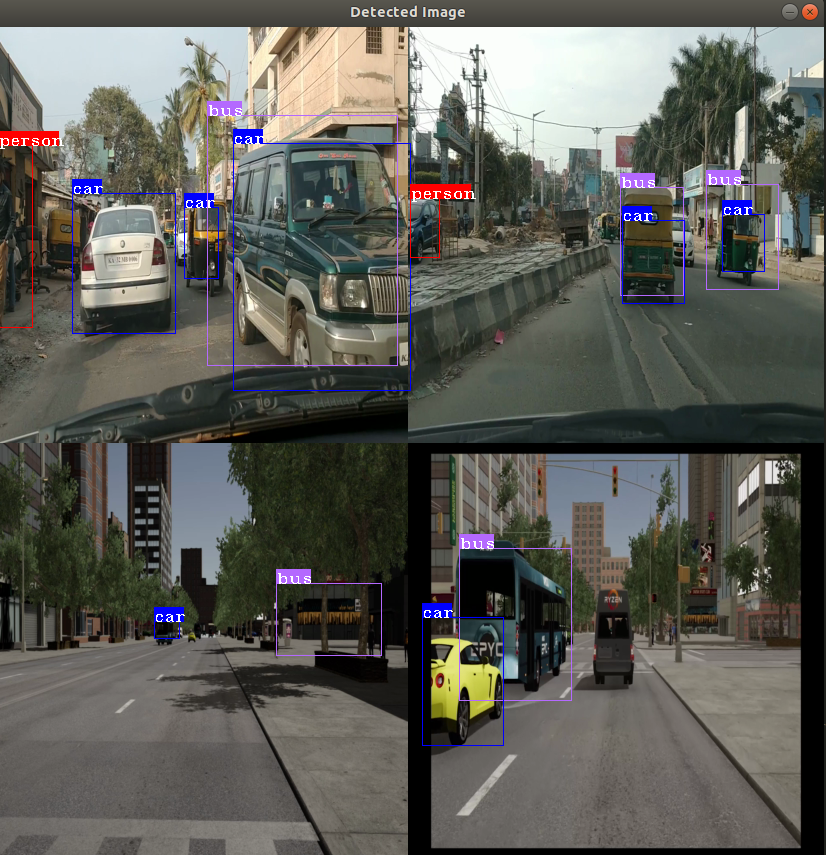
This sample shows how to run video decoding and object detection using pre-trained YoloV2 Caffe Model
The sample demonstrates the use of mv_compile utility to do video decoding and inference.
The sample has two .cpp files, mvobjdetect.cpp and visualize.cpp. But it needs extra header files, .cpp files, and inference deployment library which is generated by mv_compile utility to completely build and execute the application.
- MIVisionX
- MIVisionX installs model compiler at
/opt/rocm/libexec/mivisionx - mv_compile installs at
/opt/rocm/binand mvdeploy_api.h installs at/opt/rocm/include/mivisionx
- MIVisionX installs model compiler at
- Install MIVisionX Model Compiler Prerequisites
- Add MIVisionX libraries & executables to PATH
export PATH=$PATH:/opt/rocm/bin
export LD_LIBRARY_PATH=$LD_LIBRARY_PATH:/opt/rocm/lib
Step 1. Download pre-trained YoloV2 caffe model - yoloV2Tiny20.caffemodel
Tip
wget https://github.com/kiritigowda/YoloV2NCS/raw/master/models/caffemodels/yoloV2Tiny20.caffemodel
The mv_compile utility generates deployment library, header files, and .cpp files required to run inference for the specified model.
- Usage:
mv_compile  --model 	        <model_name: name of the trained model with path> 		[required]
	    --install_folder   <install_folder:  the location for compiled model> 		[required]
	    --input_dims 	<input_dims: n,c,h,w - batch size, channels, height, width> 	[required]
	    --backend 	        <backend: name of the backend for compilation> 	  		[optional - default:OpenVX_Rocm_GPU]
	    --fuse_cba 	<fuse_cba: enable or disable Convolution_bias_activation fuse mode (0/1)> 				[optional - default: 0]
	    --quant_mode       <quant_mode: fp32/fp16 - quantization mode: if enabled the model and weights are converted> 	[optional -default: fp32]
Tip
mv_compile --model yoloV2Tiny20.caffemodel --install_folder mvdeploy --input_dims 1,3,416,416
Note
- There will be a file libmv_deploy.so (under ./lib), weights.bin and mvtestdeploy sample app (under ./bin)
- There will be mv_extras folder for extra post-processing helper functions
- Open mvdeploy_api.h to go through API functions supported for inference deployment
mvtestdeploy is a pre-generated application built in Step 3 which shows how to deploy inference for an input image file
- Usage:
./bin/mvtestdeploy 	<input data file: image/video>					[required]
			<output file - (.bin)>						[required]
			--install_folder <folder name or '.' for current folder>	[required]
			--t <N: number of iterations>					[required]
Tip
cd mvdeploy
./bin/mvtestdeploy /opt/rocm/share/mivisionx/samples/mv_objdetect/data/images/img_04.JPG output.bin --install_folder . --t 100
Note
This runs inference for an input file and generate output for N number of iterations.
- mvobjdetect is built on top of all the files generated in Step 4. Basically it shows how to add preprocessing OpenVX nodes for video decoding and image_to_tensor conversion.
- Go through mvobjdetect.cpp file.
- This exercise uses a single or multiple video streams for input.
- The second part of the tutorial shows how to run it through multiple video files.
TODO:
- Copy all files in cloned sample folder (mvobjdetect.cpp, visualize.cpp, visualize.h and CMakeLists.txt) into mvdeploy folder. This brings all the files into a single folder to build and run the sample.
Tip
cp /opt/rocm/share/mivisionx/samples/mv_objdetect/mvobjdetect.cpp .
cp /opt/rocm/share/mivisionx/samples/mv_objdetect/visualize.cpp .
cp /opt/rocm/share/mivisionx/samples/mv_objdetect/visualize.h .
cp /opt/rocm/share/mivisionx/samples/mv_objdetect/CMakeLists.txt .
Tip
mkdir mv_build
cd mv_build
cmake ../
make -j
Note
If build directory exists from previous build, name the new build directly differently (eg: mv_build).
- Usage:
Usage: mvobjdetect <options>
	<input-data-file: .jpg, .png, .mp4, .m4v>: is filename(s) to initialize input tensor         	[required]
	<output-data-file/- >: for video all frames will be output to single file OR '-'for no output	[required]
	--install_folder <install_folder> : the location for compiled module                         	[required]
	--bb <channels, threshold_c threshold_nms> bounding box detection parameters                 	[required]
	--frames <#num/eof/loop> : num of frames to process inference         	[optional: default till eof, loop: loop the video]
	--backend <backend>: is the name of the backend for compilation  	[optional: default OpenVX_Rocm_GPU]
	--argmax <topK> : give argmax output in vec<label,prob>          	[optional: default no argmax]
	--t <num of interations> to run for performance                  	[optional: default 1]
	--hwdec <1/0>:use hwaccel for decoding                                  [optional: default cpu decoding, 1:hwdec 0:cpu dec]
	--label <labels.txt>                                             	[optional: default use yolo_v2 20 classes]
	--v :if specified visualize the result on the input image        	[optional: default no visualization]
Tip
cd ..
./mv_build/mvobjdetect /opt/rocm/share/mivisionx/samples/mv_objdetect/data/images/img_04.JPG --install_folder . --bb 20 0.2 0.4 --v
Note
- Make sure the input image and video file exist and specified with full path
- For Video -
./mv_build/mvobjdetect <PATH TO VIDEO FILE> --install_folder . --bb 20 0.2 0.4 --v - For hardware decode use
--hwdec 1
- Go through steps 2 to 6, this time compiling the model for a batch of
4using--input_dims 4,3,416,416in step 2 . - Also this sample can do batch of 8 and 16 decoding as well.
- For batch 8:
--input_dims 8,3,416,416and createVideos_8.txtfile with 8 input streams - For batch 16:
--input_dims 16,3,416,416and createVideos_16.txtfile with 16 input streams
- For batch 8:
Tip
For batch size 4
mkdir mvcompile-4 && cd mvcompile-4
wget https://github.com/kiritigowda/YoloV2NCS/raw/master/models/caffemodels/yoloV2Tiny20.caffemodel
mv_compile --model yoloV2Tiny20.caffemodel --install_folder mvdeploy-4 --input_dims 4,3,416,416
cd mvdeploy-4/
cp /opt/rocm/share/mivisionx/samples/mv_objdetect/mvobjdetect.cpp .
cp /opt/rocm/share/mivisionx/samples/mv_objdetect/visualize.cpp .
cp /opt/rocm/share/mivisionx/samples/mv_objdetect/visualize.h .
cp /opt/rocm/share/mivisionx/samples/mv_objdetect/CMakeLists.txt .
mkdir mv_build && cd mv_build
cmake ../ && make -j8
cd ../
./mv_build/mvobjdetect <Videos_4.txt> --install_folder . --bb 20 0.2 0.4 --v
Important
*Videos_4.txt has the names of input video files with full path.
- Use the
../data/Videos/Videos_4.txtfile. Modify it to specify your input files. - The last bit
(:0 / :1)chooses software or hardware mode for decoding.
This project is licensed under the MIT License - see the LICENSE.md file for details
Rajy Rawther - mivisionx.support@amd.com