![]()

Arisen requires the full AE upgrade, which means you must purchase the AE edition of the game for the list to function.
- Preamble
- System Requirements
- Installation
- Post-Installation and Optional Setup
- Playing the List
- Updating the modlist
- FAQ
- Q: Should I be worried about the Form 43 Error in MO2?
- Q: I leveled up but didn't get any perk points. / How do I get perk points?
- Q: How do I change the bodyslide on my character/on NPCs?
- Q: I can't level up, what do I do?
- Q: How do I start the main questline?
- Q: When do dragons start spawning?
- Q: How do I become the Thane of Whiterun? How do I get Lydia?
- Q: I can't find Altano in the Windpeak Inn. / How do I start VIGILANT?
- Q: Why won't Lucien talk to me?
- Q: I don't like the physics.
- Q: How do I add a Bodyslide to the list?
- Q: How do I enable my crosshair?
- Q: Wasn't this modlist originally named Apotheosis? Why the name change?
- Tweaking the Game Settings
- Removing the Modlist
- Contact
- Credits and Thanks
Arisen is a Wabbajack modlist centered around providing the player a brand new combat experience by utilizing various mods such as MCO, Precision, and SCAR, as well as an extensive amount of custom movesets to help provide a strong animation foundation. The list uses a tweaked Simonrim setup of mods to offer balanced and interesting paths of progression for the player, tuned finely to ensure compatibility with the aforementioned combat core. The list also has many hand-placed weapons and armor to maintain a fresh experience and sense of wonder while exploring.
The full modlist can be viewed here.
This work is licensed under a Creative Commons Attribution-NonCommercial-ShareAlike 4.0 International License.
Please note these specs are the best idea of a baseline that I can provide at the current moment, based on feedback I have gotten from testers and my own experiences. In the future this will be updated depending on feedback received.
| Spec Category | Default Profile |
|---|---|
| CPU | R7 3700x / i5 10600k |
| Video Card | RTX 3060 Ti / RTX 2070 / RX 6700 XT |
| Ram | 16gb (2x16) DDR4 3200mhz RAM |
| Storage | SATA SSD |
Due to the age of Skyrim, it's hard to pinpoint exactly what specs you will need to run this list. Out of testers who I know the hardware for, one has a 9700k/2070/32gb RAM, one has a 9900k/2080/16gb RAM, and I have a 9700k/3080/32gb RAM. Based on feedback I have gotten the list runs very well with few problematic areas, however I will collect more data before attempting to update these system requirements as to not try and mislead people.
I will not be supporting any AMD GPUs from before or from the Polaris Series (RX 500) and any NVIDIA GPUs from before or from the Maxwell Series (GTX 700/900), the only exception for this is the GTX 980 Ti, which is relateively equivelent to a 1660 Ti. These GPUs are simply not powerful enough to handle modded skyrim with an ENB on at 60 frames.
Total size of modlist (with downloads):
- Approx 380GB (downloads should be roughly 150GB)
Total size of modlist (without downloads):
- Approx 230GB
Due to the resources required to run modlists like these, you will need to configure the pagefile on your system in order to avoid crashes and bugs that may occur from running out of memory. This step is NOT optional, I do not care how much RAM or VRAM you have, please do this step. I suggest a 40GB fixed-size pagefile for Arisen solely for safety, but it is very possible that you could get away with a 20GB (20480 instead of 40960 in the Initial and Maximum Size boxes). While a 20GB pagefile may be usable, I do not plan on testing it any time soon, so do so at your own risk.
To set up your pagefile:
- Press Win Key + R
- Type sysdm.cpl ,3 and hit ENTER
- Navigate to Performance and click the box "Settings..."
- Click the Advanced tab at the top
- Under Virtual Memory click the box "Change..."
- Uncheck Automatically manage if it is checked
- Select your disk drive, ideally your fastest solid state drive
- Click the Custom size: button
- In the box next to Initial Size (MB) type 40960
- In the box next to Maximum Size (MB) type 40960
- Click the Set button
- Click OK
- Click Apply
- Click OK
- Restart your computer in order for your new pagefile to take effect.
Installing Arisen is relatively easy and, if you have Nexus Premium and a LoversLab account, will be a simple waiting game. If you are updating the modlist, you can safely skip to the updating section.
Prior to installing Arisen, please complete the following steps.
- Install Visual C++ x64 & .Net Runtime v6 desktop x64.
- Change Skyrim so it does not automatically update.
- Right click on Skyrim SE and click on properties, untick the "Enable Steam Overlay while in-game."
- You also need to start the games to the main menu in order to download all the creations. DO NOT SKIP THIS STEP, IF YOU DO SO WABBAJACK WILL FAIL
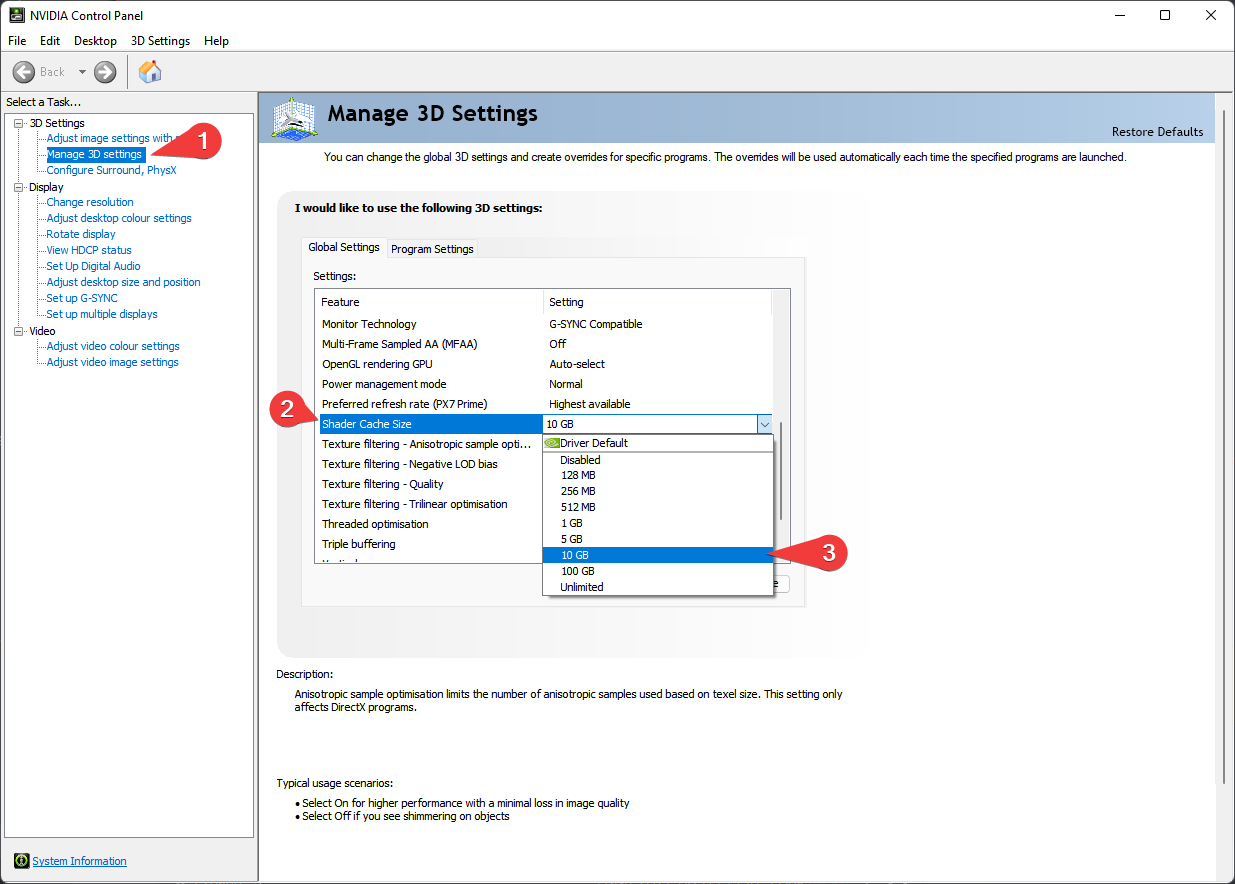
Additionally, if you have an NVIDIA GeForce Graphics Card, please do the following.
- Right-click on your desktop and select NVIDIA Control Panel
- Navigate and click on Manage 3D settings. It is the 2nd one to the top.
- Scroll down in Global Settings until you see Shader Cache Size
- Double Click Driver Default to the right of Shader Cache Size and select 10 GB
- Click Apply in the bottom right hand corner.
- You may exit out of the application.
If you have never installed the Creation Club Content before, please do the following.
- Purchase the Skyrim Anniversary Edition Upgrade from Steam. If you do not do this, you can not install or play the list.
There is no work around for this and pirating this content will not work. If you pirate the content and come asking for assistance, you will be banned.
- Once you have the Anniversary Edition bought, do the following steps below.
- In your Steam Library, right-click on the menu entry for Skyrim, select
Propertiesand then selectLocal Files. ClickVerify Integrity of Game Filesand wait. - Once this is completed, launch the game once from Steam. You may receive a prompt that your settings were detected or not detected, this does not matter, nor do any options you select here. Simply open the launcher and launch the game.
- Once the intro logo finishes displaying and the Skyrim logo appears, you should receive a prompt to "Download All Content?" Accept this option.
- If you did not receive a prompt to download, select the Creation Club option from the menu, and you should find a "Download All" prompt in there somewhere. If this message does not appear, you have not purchased the $20 Upgrade. Begin again from step 1.
- Wait for the download process to complete. Do NOT ALT-TAB during this process as it will cause the process to fail and you will have to start over again.
- Proceed with the rest of the installation.
Once you have completed pre-installation, download the latest version of Wabbajack on this github and place it in a folder such as C:\Wabbajack. DO NOT place it in Program Files, User folders (such as Desktop, Documents, Downloads, etc.), or in your Skyrim's Steam folder. I recommend placing it on an SSD as it will work quicker on there.
Downloading and installing Arisen can take a while depending on your internet connection and computer. To install Arisen, complete the following steps.
- Open Wabbajack and click
Browse Modlists - Tick on the
Show Unofficial listsoption in the top right corner of Wabbajack - Press the download button on Arisen and wait for it to download.
- Set the installation folder to be somewhere like C:\Games\Arisen. DO NOT place it in Program Files, User folders (such as Desktop, Documents, Downloads, etc.), or in your Skyrim's Steam folder
The download location does not need to be on a SSD, but it makes installing faster.
- Press the play button to begin.
- Go and pet your nearest fluffy animal whilst Wabbajack does its thing. Alternatively read through this readme again.
- If the installation is successful, jump for joy and move onto post installation. If the installation is unsuccessful, follow what is below.
Some files require loverslab for this list (none of them are sex mods).
- Tempered Skins for Males - SOS Light Version - part 2 of 2 v2.051
- SOS - Schlongs of Skyrim - LightSE
Sometimes Google Drive and MEGA will experience bandwidth caps, so below I have included the links to the files that require them.
- High Poly Head
- Eskyrim Spear
- Olivier Kenjutsu Battleaxe and Warhammer
- Olivier Kenjutsu Katana
- Olivier Kenjutsu Sword 2.0
- Olivier Kenjutsu Sword 1.1
- OCPA 1.2
- Tullfx Bloodstorm
- ADXP/SCAR Sneak Fix
- Cosmofujia's EldenRing Spears
- Cosmofujia's ER Black Knife & Godslayer's Greatsword
Sometimes the SkyrimGuild website also runs into issues so I suggest downloading these in advanced as well.
Patreon downloads incase they give problems.
It is possible that you may encounter an error with Wabbajack when installing. Some common issues are listed below.
-
Could not download x:
- Big files can fail to download due to connection issues. You can either run wabbajack again or download the file manually. If you decide to manually download it, make sure to place it in the same place as the other downloads.
-
X is not a whitelisted download:
- This may happen when I update the modlist. Please check if there is a new update or wait until you see a release ping.
-
Wabbajack could not find my game folder:
- Either buy the game or go back to the Pre-Installation step.
-
Antivirus reports a virus:
- Windows 10/11 may automatically quarantine a key file which is needed for Mod Organizer. You can fix this by adding an exclusion for Mod Organizer in windows defender.
-
Unable to download
Data_ccXXXXX - *.bsaor*.esp:- This error means that there is an issue where Wabbajack is unable to hash your Creation Club Content. If you have followed the steps outlined under Pre-Installation, are not on a pirated copy of the game, and have verified your steam files, then it is very likely that Wabbajack or Bethesda has messed up the hashing for these files. If this is the case, please wait for it to be resolved before continuing to download the list.
Arisen uses a Wabbajack feature called Stock Game to keep your Skyrim installation clean. All the files that you need to run the list are in a folder called Stock Game. You don’t need to copy anything at all.
Generally speaking, using Windows Defender is advised as it is a solid antivirus software that will have minimal interference with the game. Antivirus programs can be notorious for false flagging MO2's VFS as problematic, causing crashes or other problems.
If you use Windows Defender, it is advised that you set up an Exception for the modlist. To do this follow these steps.
- Press the Windows Key.
- Type "Windows Defender" in the search bar and select "Windows Security".
- Click on "Virus & threat protection" in the left pane.
- Click the "Manage settings" option under "Viruse & threat protection settings".
- Scroll down to "Exclusions" and click "Add or remove exclusions".
- Windows Defender will prompt you with a run as administrator screen, just hit yes.
- Click the "Add an exclusion" button at the top and choose "Folder".
- Navigate to your Install folder for the list and click "Select Folder".
- (OPTIONAL) You can repeat these steps for the ModOrganizer.exe (
Path to Modlist\ModOrganizer.exe), the Nemesis Executable (Path to Modlist\mods\Project New Reign - Nemesis Unlimited Behavior Engine\Nemesis_Engine\Nemesis Unlimited Behavior Engine.exe), and Synthesis (Path to Modlist\tools\Synthesis\Synthesis.exe)
Arisen offers some mods to provide (potential) Ultrawide and Widescreen Support. Under the (Possible) Ultrawide Support Separator in MO2 you will find some mods that you will want to activate if you are playing on Ultrawide or Widescreen resolutions (21:9 or 32:9).
IN ORDER FOR THESE FIXES TO WORK YOU NEED TO DO THE FOLLOWING
- Search for Nordic UI XXX Patch (XXX being the "21 by 9" or "32 by 9" depending on your screen resolution) in the left pane of MO2 and delete or hide the following files:
a. /interface/tweenmenu.swf - Search for SunHelm Survival in the left pane of MO2 and delete or hide the following files:
a. /interface/skyui/bottombar.swf
b. /interface/skyui/itemcard.swf - Search for Experience in the left pane of MO2 and delete or hide the following files:
a. /interface/statsmenu.swf - Search for Compass Navigation Overhaul in the left pane of MO2 and open the .ini file,
CompassNavigationOverhaul.iniand edit the following line(s):
a. PositionX=-0.127

- Once in game, navigate to the TrueHUD MCM Menu, and change the following values:


Arisen offers some mods to provide support for individuals who wish to play with a controller or gamepad. In order to set it up correctly please follow these steps:
- Under the Gamepad Support Separator in MO2, activate Gamepad Controlmap Fixed
- Go to
(Path To Modlist)\Stock Gamefolder and delete ControlMap_Custom.txt a. Alternatively you can reset your controlmap in-game. - Search for OCPA Custom for ADXPMCO in the left pane of MO2
- Right Click the mod > Information > INI Files and click on SKSE\Plugins\OneClickPowerAttack.ini
- Change the following value(s):
a. Keycode=47 to Keycode=281
- This will change the power attack bind to right trigger, if you wish to use a different key please refer to this link.
Due to requests, Arisen now offers the ability for the user to remove nudity and some NSFW elements from the list. In order to set it up correctly please follow these steps:
- Under the (OPTIONAL) SFW'ified Addons Separator in MO2, activate Dark Souls Undressed and SFW Override mods.
- You're done. It's that easy.
Please note that there is some clipping on "larger" bodyslide presets with the underwear that is added by this addition. I will make 0 attempts to fix these and please do not bother the original mod author about it.
- For those looking for a Gameplay guide or an overview for what the list has to offer, click here.
- To get an idea of what animations are used in the list, click here.
- To know what graphic mods are used in the list, click here
- To know what NPC Replacers used by this list, click here
Obligatory DAR Cache warning: due to the nature of this list and the amount of DAR based animations it uses, it does take some time (usually 15-30 seconds) at the start of each play session for DAR to cache all the folders and animations. While cleaning up the folder setup to try and alleviate this issue is a long term goal for the list, please do realize that this issue is out of our control as it is an issue with DAR itself since it does not allow for pre-cacheing animations via Nemesis or during loading screens. If you complain about this in the discord, on nexus, or on the github page, you will be linked back here.
- (Optional) For those of you with arachnophobia, the list includes a mod called bingus hates spiders.esp, this is my personal patch that removes spiders from the leveled list and replaces spiders with other creatures within the list. It also has a few other tweaks to make it a bit more in depth than something like Insects begone.
- At the current moment, the patch only affects spiders (so chaurus and similar will still be present, tho if requested I could make another version of this patch that also removes those mobs).
- Head over to the installation folder and locate an executable named ModOrganizer.exe and launch it. If a message Registry Key does not match appear, press Yes. Once it's launched, there will be a dropdown box on the top right and a big run button next to it.

- Launch the "Arise My Champion!" Executable in MO2
- Arisen comes with a start save by default, so when you load into the main menu, choose "Continue".
- Arisen uses Skyrim Unbound as our alternate start mod.
- In order to start chargen hit Enter as soon as you load in
- If your character seems to be frozen during RaceMenu, just swap race or gender and swap back, it should unfreeze them. This is an issue with DAR Cacheing.
- Once you are finished with chargen, feel free to open up the Skyrim Unbound MCM menu and customize your Standing Stone, whether or not you're a vampire/werewolf, equipment, spells, and starting location.
- You may also want to choose whether or not your character is the Dragonborn; and if they are not, whether or not they are able to use shouts.
- Once you are finished choosing your options for the Alternate Start you desire, hit Enter again and choose Continue.
- In order to start chargen hit Enter as soon as you load in
- Read over the Control map.


- Skyrim Unbound: Choose your Standing Stone, starting location, starting equipment, starting wealth, etc. By default, the player is set to become Dragonborn, so if you do not want that for some reason, turn it off. I highly suggest against choosing to not become Dragonborn, as it will lock you out of a lot of content within the list.
- Dragons by default are set to appear after 7 to 21 days, and will appear at word walls before appearing in the wild. If you wish to make them spawn faster/slower/instantly or want to make them spawn based on level instead, you can change it here.
- Animated Overlays: If you want to do some fun stuff with your RaceMenu overlays.
- AutoBody AE: Change your AutoBody Menu keybind here. (Default:
;) - Better Third Person Selection: Enables the filters to reduce the possibility that the player character accidentally steals items when trying to interact with the world. Turn these filters off if you do not like them.
- Bow Charge Plus: Dodge Shot does not work with DMCO.
- Dodge Framework: Change your dodge keybind here (Default:
L Alt). - Dual Wield Block: Change your Dual Wield Block keybind here (Default:
B). REMEMBER TO CHANGE IT IN VALHALLA MCM MENU AS WELL - Favourite Howls Menu: Customize which powers will be in your favorites menu (for werewolves).
- Hide Your Quests: Allows you to hide quests from your journal (not useful on startup, obviously).
- Improved Alternate Conversation Camera: Tweak the dialogue camera here.
- Notable settings include: Switch Target (for Witcher-Style Dialogue Camera), Force Third/First Person, Camera Offsets.
- Leveling Freedom: By default the list uses the "Recommended" settings. Feel free to choose another preset or make your own to customize the leveling curve.
- Lucien: Can choose a name or nickname for Lucien to call you by (if available).
- Optimal Potion Hotkey: Change your Health potion hotkey (Default:
F). Add a hotkey for stamina/magicka potions. - Pronouns: If you selected They/Them, you must go into the MCM and set up Fallback pronouns. If you set Multiple, you can select the % chance of pronouns.
- Seiro's Hotkeys: Set up additional hotkeys here.
- Simplest Horses: Change your Horse Control hotkey here (Default:
H). - SmoothCam: By default the list uses a modified version of dTry's Raven's Gaze SmoothCam preset. The list also includes Loki's Souls-Like Preset and SynHC's SynErgy Preset. You can change your shoulder swap keybind here. (Default:
Mouse4). - Static Skill Leveling: MCM menu does not work, if you wish to tweak this, do it in xEdit. By default you get 10 skill points per level and every skill increase requires 1 point.
- SunHelm: Disabled by default, can be activated through the MCM or by sleeping in a bed.
- Please note that enabling Sunhelm will require you to sleep each time you want to level up.
- I suggest putting the "Widget Display Type" to Alpha Based
- SunHelm Auto Eat and Drink: Enabled by default. Can change the Toggle bind here. (Default: Not Set)
- Taunt Your Enemies: Change you Taunt keybind here (Default:
G). - True Directional Movement: Change your Target Lock keybind here.
- Valhalla Combat: The core of the combat balance in the list.
- Stamina: The settings here have been configured for what has been determined to be the most balanced gameplay. Feel free to tweak them to your liking. Please note that dTry's Exhaustion system is disabled due to causing enemy aggression problems and it was decided it would be better if it was off.
- Timed Block: You can enable or disable the Tackle mechanic (Default:
enabled). - Stun&Execution: By default the list disables dTry's stun system as it is not well balanced right now.
- Compatibility: Please do not enable the Poise compatibility option. While the list does use Poise, due to the DAR setup and witchcraft we have done to make it play nicely, enabling this compatibility option breaks the setup. If you previously changed your Dual Wield Block keybind in Dual Wield Block MCM, then please also change it here.
- TrueHUD API should say "Not Obtained" next to it, this is due to disabling the Stun System.
- If Special Meter Control says "Not Obtained", do not worry about this. As of current the Stun System is disabled due to balancing reasons.
Wabbajack downgrades your install for you to version (1.5.97) of Skyrim. Please do not downgrade your steam install or the modlist yourself, but as stated at the top of this document, it does require the paid update.
Before updating, please check the changelog and back up your saves. You may need to start a new game after certain updates. If you are curious to know if an update is save safe or not, then refer to the version number. The first digit should indicate major version, second digit should indicate minor version (these are likely to be save safe unless otherwise specified), the third digit will mostly represent bug fixes, etc.
- If the modlist is updated from
1.0.0to2.0.0, then this version is likely a major overhaul of at least one system and will not be considered save safe. - If the modlist is updated from
1.0.0to1.1.0, then this version is not save safe. - If the modlist is updated from
1.0.0to1.0.1, then this version is unlikely to be save safe, unless the changelog specifically says so. In cases where the update is save safe, you will need to perform additional steps to maintain the health of your save. - If the modlist is updated from
1.0.0.0to1.0.0.1, then this version is a hotfix and 100% save safe. - The changelog will almost always have a note about whether the update is save safe, and whether there are any additional, precautionary steps you should take to ensure your saves do not have issues.
Updating is like installing the list. Simply make sure your paths are the same and tick the overwrite existing modlist button. Note: Any mods you have added will be deleted when updating. To make sure that Wabbajack does not delete your added mods upon updating, prefix your mods with [NoDelete].
ALWAYS back up saves before an update. Because of the method Wabbajack uses to include the start save, any save within the profile will be wiped.
Please make sure you back up your saves if you plan on continuing a playthrough across a save safe update.
A: The "Form 43" warning in the notifications section in the top right of MO2 is completely normal and can be safely ignored. It is a result of Distar not flagging ADXP as the correct Form and because it does not cause any issues, it was ignored.
A: Read the Progression Section of the Gameplay Guide. You do not get Perks the traditional way in Arisen.
A: The list uses AutoBody instead of OBody to handle Bodyslide distributions and morphs. By default the keybind to open the AutoBody menu is ;, but it can be changed in the AutoBody MCM menu.
A: You likely have SunHelm enabled, go sleep in a bed.
A: If you have chosen to be Dragonborn in the Skyrim Unbound MCM settings, then upon killing your first dragon, you will be summoned by the Greybeards. If you have chosen to not be the Dragonborn, then you can not proceed with the main questline, doing so will also lock you out of a fair amount of content in the list due to the way quest progression is setup.
A: By default, dragons are set to be delayed in their spawns from 7 to 21 days after you leave the starting room. By default, dragons will begin showing up at their Word Walls before you will encounter them in the wild.
A: You must complete The Blessings of Nature quest and talk to Jarl Balgruuf when the Gildergreen tree is repaired/the sappling blooms. He'll thank you and allow you to buy the Breezehome, and the standard thaneship quest (help people of the hold and buy a house to become a thane) will be available.
A: Currently (though this may change in the future), VIGILANT requires the player be level 25, completed House of Horrors, and completed Kindred Judgement (the final quest of Dawnguard DLC). This is because my ideal progression curve for quests should go something like:
- A guild questline
- Main Questline up to A Blade in the Dark
- Dawnguard DLC (recommended level: 15-25)
- VIGILANT
- Main Questline up to at least Alduin's Bane
- Dragonborn DLC (minimum level requirement: 40)
- GLENMORIL
- Main Questline through Dragonslayer (if not previously completed)
- UNSLAAD
Please note that there are other quest mods in the list, aswell as a lot of other content, so they should be filled in wherever to gain levels and experience. This is just a rough map of my ideal character and power progression.
A: You selected They/Them pronouns. Go into the Pronouns MCM, select She/Her or He/Him, then speak to Lucien again. After you have gotten him as a follower, you are free to switch back to They/Them.
A: This isn't a question. If you don't like the body physics preset included in the list, I suggest disabling 3BA RFBBBT v3.0 - AutoGibbon Settings - Update 3 in MO2 (if you want a more "stiff" preset) or searching nexus for a new CBPC preset that is more "jello-like".
A: You have two ways to go about this. The way I would suggest is to open the following file [Path to Modlist]\mods\AutoBody AE - Configurable Randomized Bodies\autoBody\Config\morphs.ini and add the bodyslide's .xml name to the end of the All|Female|(InsertRace)= line. Alternatively, if you do hate the way bodyslide presets are distributed in the list, you can either delete the entire morphs.ini file or (more reasonably) delete all of the lines in the file that are All|Female|(InsertRace). Please note that you do not need to build the bodyslide preset in Bodyslie as all armors are already built and Zeroed Sliders to support AutoBody (which functions like OBody).
A: Disable the Contextual Crosshair mod, under the "Heads Up Display (HUD)" Separator in MO2.
A: There were some conversations over the name and it was decided that the name would be changed to minimize any long term drama or problems that would have arisen from it.
To get some more FPS, tweak the following value in the detail section in BethINI.
Shadow Resolution: 2048Ambient Occlusion: Either use this or the ENB version. The ENB version is more intensive. Do not have both turned on.Remove Shadows: I really don’t recommend turning this on, but if you must, then you can.
If you want to tweak your ENB to improve performance, consider looking at Annakin's ENB Tips guide.
To quote her, here is a short answer to improve performance with an ENB turned on.
- Uncheck
EnableLens.- Uncheck
EnableBloom.- Uncheck
EnableDepthofField.- Uncheck
EnableTessellationinWATER.- Uncheck
ComplexFireLightsandComplexFireLightsOR
- Uncheck
EnableBigRangein these two settings.
Simply delete the folder, and you have uninstalled it.
Please check the bug-reports channel in discord first if you have any issues. PLEASE DO NOT DM ME ON DISCORD. If you have an issue with the list, please join the Waking Dreams discord server for support.
- YOU for reading this.
- Ylikollikas for doing the vast majority of the back end work on animations and the Special Attacks system.
- Curly for allowing me to use his graphical baseline as the core of my list.
- Bingus for helping me with ENB tweaking, playtesting, nifs, mod page screenshots, the final version of the logo/banner, and the MO2 splash.
- iAmMe for helping me with the CK, documentation, and general WJ related things. As well as fixing some of the FaceGen (check out Tahrovin if you're looking for a VR list).
- Chanka and fray for help with playtesting and documentation.
- Jolly Co-Operators for getting me more comfortable with modding.
- JustThatKing and jdsmith2816 for their help with graphics and some miscellaneous.
- Noggog for Mutagen and the xEdit team for xEdit and their tools.
- Halgari and the WJ Team for this amazing platform.
- Cosmofujia for a significant amount of high quality Weapon Models.