Xiǎomāo is a development board geared toward hardware hacking and hardware implant design that can safely interfacing with a wide range of logic levels
Xiǎomāo (小猫) means 'small cat' and gets its name from the original revision which used the the small Seeed Studio XIAO SAMD2 module with the catlike tigard-tools wiring harnesses. The current version, Xiǎomāo v2 is a redesign based on an RP2040 but the Xiǎomāo name stuck.
If you have an old Xiaomao v0.1 or 0.2, check the older version of this readme
Xiǎomāo fits under the tigard-tools umbrella because it repurposes Tigard's wiring harnesses and complement's Tigards features by providing a wide-Vio-range programmable device. It was designed to fill gaps in what Tigard was able to do for some of the labs in Applied Physical Attacks #2: Hardware Pentesting. Xiǎomāo should be well suited for:
- Bitbanging protocols, even those with bidirectional pins
- Standalone operation, such as dropping a protocol payload on a target
- Implant-in-the middle attacks on various protocols
While unidirectional level shifting works well on Tigard, bidirection level shifting is cursed and should be avoided whenever possible. On a general-purpose microcontroller board, we don't know ahead of time which pins will be used as inputs or outputs.
Xiǎomāo is intended to be a very cheap module with 'just enough' protection to not damage most targets:
- Sensing low-voltage high signals: The RP2040 on Xiǎomāo is nominally running at 3.3V, and per spec Vih = 2V, but in practice, this is good enough for us to discern high and low voltages from 1.8V output pins.
- Tolerating high and low voltage on I/O pins: Xiǎomāo adds 200 ohm resistors in series on each gpio pin, and the ATSAMD can tolerate IOVDD+0.5v on the I/O pins. If 5V are applied to a pin, the microcontroller would only need to sink about 5 mA to drop the voltage into a safe range. While a larger resistor would be ideal, it would limit the low-voltage sensitivity of the pins.
- Operating in wide voltage ranges: Vcc pins on the headers connect to the 3.3v regulator. Voltages over 3.3v will be regulated to 3.3v, and voltages lower than 3.3v will only drop about 50mv through the regulator. This means Xiǎomāo should work at as low as 1.84v, although USB may not function below 3.3v
- ESD/TVS: Modern ICs have at least minimal ESD protection. Additional ESD protection would increase the size and cost of the device, which is intended to be low cost and consumable, and would be of limited benefit to the target device. For this reason, ESD/TVS protection is skipped on Xiǎomāo.
Depending on the usage, there are a wide variety of alternatives. Xiǎomāo was designed with lots of tradeoffs in mind - some of these alternatives are going to be better for certain uses.
- The JTAGULATOR is far more robust than any other option for seeking out JTAG interfaces - especially when you're dealing with irreplaceable targets that you really don't want to brick.
- Glasgow has robust, direction-switchable level shifting in additon to massively configurable I/O, but too large, expensive, and power-hungry for implant-style use.
- The Teensy family far exceeds the I/O and computational performance of the other options. Teensy V3.2 is 5v tolerant and would be the best alternative
- The Arduino Pro Mini (ATMega328p) is very cheap and operates at a wide voltage range, but requires a UART programmer
- The Arduino Pro Micro (ATMega32U4) is also inexpensive and capable, but doesn't work on as wide a range as the Mini
We settled on the Seeed Studio XIAO SAMD21 for v1 because it was small, cheap, 1.8v sensitive, usb-c, easily supported in arduino and circuitpython, and readily available in September 2021. V2 uses the RP2040 for greater capabilities, similar I/O, lower cost, and greater availability.
Xiǎomāo was designed for automated assembly.
Xiǎomāo ships with a slightly modified JTAGScan, though it should work with any more recent version of JTAGScan
Until Xiaomao-specific configurations are complete, choose a Raspberry Pi Pico when coding for Xiaoamo:
The RP2040 used on XIAO supports debugging over the SWD pins. Xiǎomāo makes these pins accessible on the SWD header. To set up Tigard, OpenOCD, and GDB to work with Xiǎomāo:
- Connect the first 4 pins of the JTAG header to the SWD header on Xiǎomāo. That's VTGT, GND, TCK and TDI
- Set Tigard's VTGT switch to 3.3v and mode switch to 'SWD/I2C'
- Connect Tigard to your computer via USB
- Run OpenOCD:
openocd -f tigard-swd.cfg -f target/rp2040.cfg - Start GDB:
gdb-multiarch - Connect to OpenOCD:
set arch arm; target remote localhost:3333
Use either jtagenum or jtagscan to search IO pins for JTAG interfaces. Jtagscan is a cleaner and quicker option, but has issues with more than 8 pins. Jtagenum has many more options but a difficult user interface. Xiǎomāo has been tested on 1.8, 3.3, and 5v targets.
Arduino Examples -> 04.Communication -> AsciiPrint is a good starting point for using Xiǎomāo to drop a UART payload to a target, for example some console commands that would open up a network shell, or console commands that would write out a malicious binary to storage.
Arduino Examples -> 04.Communication -> SerialPassthrough is a good starting point for using Xiǎomāo to modify UART data on the fly. You can prototype looking at all the data over the USB connection, but when you have it working, you can use it standalone - Use the Tigard UART harness and connect VTGT, GND, TX and RX to have your implant read data on RX and output modified data on TX.
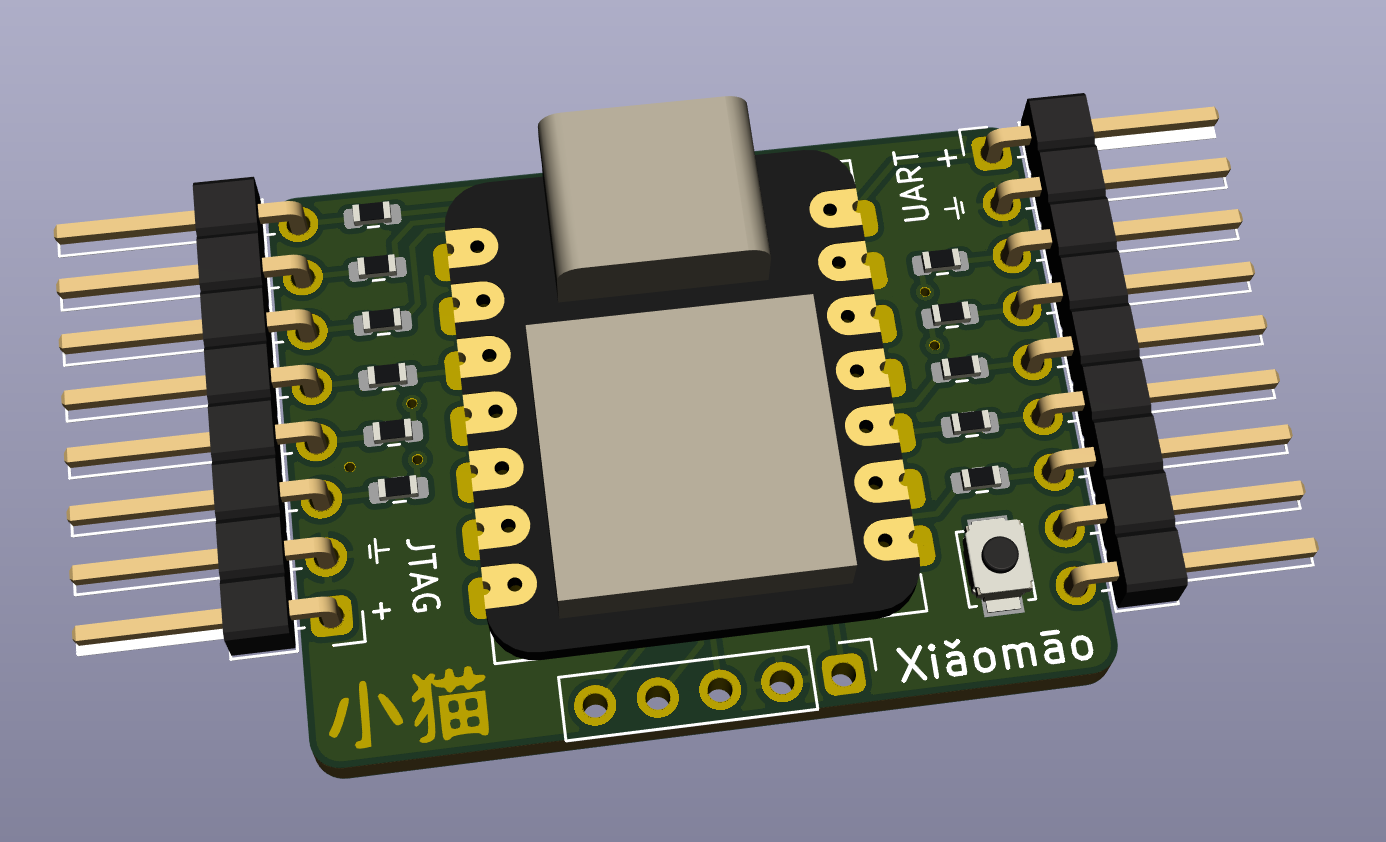
8-pin header for use with tigard's jtag harness, and usable as a JTAG implant with the wires as labeled
| Header Pin | Xiaomao label | rp2040 pin | Wire Label | Color |
|---|---|---|---|---|
| 1 | PWR | VIN | Red | |
| 2 | GND | GND | Black | |
| 3 | D0 (TX) | GPIO0 | TCK | White |
| 4 | D1 (RX) | GPIO1 | TDI/COPI/SDA | Grey |
| 5 | D2 | GPIO2 | TDO/CIPO/-- | Purple |
| 6 | D3 | GPIO3 | TMS/SS/-- | Blue |
| 7 | D4 (TX) | GPIO4 | TRST/--/-- | Green |
| 8 | D5 (RX) | GPIO5 | SRST/--/-- | Yellow |
9-pin header for use with tigard's uart harness. Ships with only first 4 wires installed, and usable as a UART implant with the wires as labeled
| Header Pin | Xiaomao Label | rp2040 pin | Wire Label | Color |
|---|---|---|---|---|
| 1 | PWR | VIN | Red | |
| 2 | GND | GND | Black | |
| 3 | D6 (TX) | GPIO16 | TX | Green |
| 4 | D7 (RX) | GPIO17 | RX | White |
| 5 | D8 | GPIO18 | Grey | |
| 6 | D9 | GPIO19 | Purple | |
| 7 | D10 (TX) | GPIO20 | Blue | |
| 8 | D11 (RX) | GPIO21 | Yellow | |
| 9 | D12 | GPIO22 | Orange |
No header, but for control of RGBLEDS:
| rp2040 pin | Purpose |
|---|---|
| GPIO6 | Neopixel Power |
| GPIO7 | Neopixel |
5-pin header is unpopulated and gives access to the programming pins on the bottom of XIAO.
| Header Pin | rp2040 Pin |
|---|---|
| 1 | |
| 2 | |
| 3 | SWCLK |
| 4 | SWDIO |
| 5 | /RESET |